Friday, 12 September 2014

How to add pin-it button for image sharing on each images for wordpress

Social media for image is best internet marketing for website/blog. Now point is that how to make easy it, to share images from wordpress on pin-it.

You can add pin-it button at top right corner on all images which is in your post, article, and pages.

For visitors, easiest way is to share images on pinterest using layered pin-it button.

Why pinterest is useful for wordpress images sharing – add pin-it button

From there you will get millions of images in single roof. You can share own images over worldwide in single click. More over the European counties people always prefer pinterest as a best image sharing way. From the pinterest you will get high resolution finest images on each topic and word.

Useful: Best social networking sites for SEO and online marketing.

Apart from the pinterest, you can also share your images on other images sharing alternative sites.

You can use direct plugin for pin-it button on image, jQuery Pin it Button for image, Pinterest Pin It Button For Images.

Steps to add pin-it button on image for wordpress image

Step 1

You can choose any of one pin-it plugin given in below,

jQuery Pin it Button for image,
Pinterest Pin It Button For Images (Personally used this)
Then install it in your wordpress dashboard directly, Get more idea on plugins installation guide.
Add Pin-It Button plugin for wordpress

Step 2

After choosing best pin-it image plugins for wordpress, install it in your website.
Activate installed Pin-It plugins
Step 3

After successfully installed, Small setting have gives in below image and save it.
Activate installed Pin-It plugins

Pin-It pinterest plugin setting
Select Option To display Pin-it button on image

Now you can check in your wordpress website/blog, All images on your screen contains pinterest pin-it button.

You have any suggestion than comment in below, we will be glad to assist you. Don’t miss to read our article on Domain suggestion, wordpress, and installation guide.

Conclusion: Pinterest is in list of best social networking site to get visitors and traffic in short time. From this post you can make sharing your post using images is so easy, with pin button on each images of your article. So add pin-it button in your wordpress blog/website, and share experience on valuable result in below comment.

Labels: , , , ,

Thursday, 28 August 2014

How to install wordpress on BlueHost – Wordpress tutorial

BlueHost is one of the best Wordpress hosting platforms. In past I shared articles on install wordpress on Hostgator. Install wordpress on locally. Now in this tutorial you can get basic idea for install wordpress on BlueHost. Before you start and choose yours best hosting platform, you have an idea of free domain, Support service, Bandwidth, Disk space, Network Uptime, plan price.

For all these criteria, BlueHost is one of the best hosting platforms for wordpress blog or website.

Below link, helps to study about all best hosting platform. With comparisons and users reviews.

Useful: wordpress hosting sites – 2014 best hosting platform


Steps to install wordpress on BlueHost: wordpress website or blog

Step 1 - install wordpress on BlueHost

You can buy any hosting plan online. After you have registered domain name and password in BlueHost. Go login Screen through below link,

https://my.bluehost.com/web-hosting/cplogin

Enter in cPanel after successful submiting domain and password.

Wordpress-installation-on-bluehost-login-screen
Wordpress installation on bluehost - login screen

Step 2 - install wordpress on BlueHost

You next screen is cPanal. using cPanal, you can install wordpress setup in one click.
Wordpress-installation-on-bluehost-install-screen-1
Wordpress installation on bluehost - install screen
Software service > Wordpress

Step 3 - install wordpress on BlueHost

Wordpress-installation-on-bluehost-install-screen
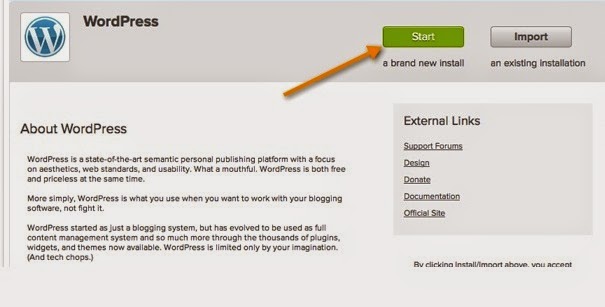
After step 2, you next screen is to install wordpress.

Wordpress installation on bluehost - install screen
For first time, new installation click start button
To import external wordpress setup select import.

Follow the next step with correct details in your next screen like,
• Domain name of blog or website
• Name of website
• username
• password
• email address

Using this username and password you can manage your wordpress blog or website.

Useful: How to choose best domain name: Domain registration sites

Now submit you’re all the details after successful installation.

Step 4 - install wordpress on BlueHost

To login your link must be:
http://www.yourdmainname.com/wp-login

Ex: http://www.howtoisolve.com/wp-login

To know more plugins installation, SEO on wordpress, Theme installation. Touch with use through Facebook, twitter and Google+.

covered questions for this post ,
wordpress install on bluehost - 2014
how to install wordpress on hosting server
How publish wordpress website on bluehost

Don't miss to share this article and add your suggestion in below comment box. We will be glad to assist you.

Labels: , , , ,

Wednesday, 6 August 2014

How to install wordpress in local computer using wamp server

Install Wordpress on local machine is first stage to create websites or blog in free of cost. Before that you have to do some installation process. You can install wordpress on any platform locally like windows machine.
For that you can install wamp server in your local machine. Wamp makes your PC or Laptop as a server. Using this server you can install any wordpress theme and tools directly in single click. Here I have described all the process from installation to completed websites or blog in wordpress, in below.
Install Wordpress is so easy for any nontechnical person, who wants to build any personal website or blog. To create wordpress website just follow the below simple steps.
Create PHP websites, Wamp server is also useful. if you having any problem of wordpress installation, You can comment in below comment box.

Dashboard for locally installed wordpress

Wordpress installation Points will be covered - install wordpress

1. Install WAMP setup in your computer.
2. Install wordpress website
3. How to manage your wordpress website: Folder management
4. Add Wordpress website Database for wordpress website: Using MySQL
5. Open your wordpress website in browser.

1. Install WAMP setup in your computer.-install wordpress

First you have wamp server setup file.
You can download wamp server setup on it's official site: Click here to download: You shall download for 32 bit or 64 bit setup for different system.
http://www.wampserver.com/en/download.php
You can open wamp server from icon (hidden icon at bottom of your screen). After click on wamp server icon, you can see options give in below.
  • Localhost
  • PHPMyAdmin
  • WWW directory
Now, click on localhost. Your browser will show server access screen. You can see locally hosted wordpress website in browser screen. For the first time your screen looks like in below.
Wordpress install step for wamp server
Install Wordpress - WAMP server installation step 1
Install Wordpress - WAMP server installation step 2
Install Wordpress - WAMP server installation step 3

Install Wordpress - WAMP server installation step 4
Install Wordpress - WAMP server installation step 5
Useful: on wamp server, HTTP: 401.2 - Unauthorized error page
If you haven't any error, so congratulation for your successful installation on wamp server in desktop or laptop locally.
After successful install wordpress on local machine, your next step should be download wordpress setup.

2. Install wordpress website on wamp server - install wordpress

First you need to download wordpress setup from its official sites: www.wordpress.org (current wordpress version 3.9.1)
Wordpress install locally step 2 - 2

You will get wordpress in zip folder. After unzip wordpress file, you will get wordpress folder. Copy this wordpress folder and past it under wamp root directory.

Then click on wamp icon > localhost >
Wordpress install locally step 2 - 3

You can see your project (Wordpress website) will be show which is under the root directory. (In browser)
Wordpress install locally 2 - 4


Next: How to change wordpress theme from dashboard?

3. Add Wordpress website Database for wordpress website: Using MySQL

After click on website your you can see wordpress configration form given in below,
For that you need database for wordpress website,
Open your browser and give URL: localhost/phpmyadmin/

Now you can see mysql database. Create new database
Wordpress installation Guide on locally - Create a New database 3 - 1
Wordpress installation Guide on locally - Create a New database 1
4. Open your wordpress website in browser - install wordpress
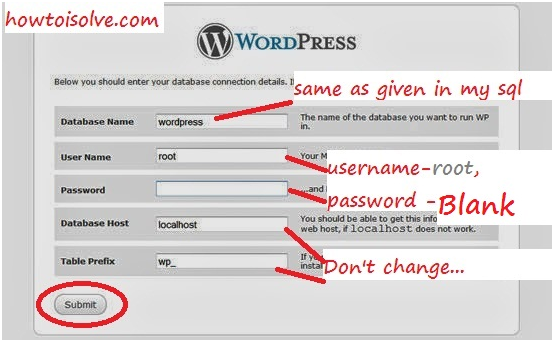
In your first attempt, your screen looks like in below.
Submit Database name, User name only.
Wordpress installation Guide on locally step for sql connectivity

Click on run and install
Wordpress installation Guide on locally step for sql connectivity step 2


Now you have to enter wordpress website title (Not mandatory). User name, password and email address are required fields.
Download Wordpress for locally install step 3
Then click on submit,
Download Wordpress for locally install step 4
You can login with User name and password,
Login screen for locally installed wordpress
After successful login, you can see wordpress website dashboard. That is very very comfortable to customize your wordpress website or blog.

So thanks, Wordpress.
You have any problem in installation, manage multiple website, than comment in blow comment box.
We feel glad to assist you.
Thanks for visiting,

Labels: , , , ,