Friday, 25 July 2014

Define Page rank For To Increase SEO Performance. How To Check?

Each every blogger and webmasters always finding the term “Pagerank”, “What is Pagerank”, “How to increase it”, “Why I am not getting pagerank”, “Criteria to archive the best pagerank”.
If you don’t know then this post is helpful to you in future and you can archive good pagerank in short of time. At the starting stage of blogging pagerank should be zero. It will affect as on time to go with perfect blogging.

Pagerank gives you map of importance of your web in google search engine. Google give it after applying google pagerank algorithm. Google pagerank’s algorithm.

Google algorithm finds the calculation your web post URL reputation on over the world wide websites including social sites. Means how many links are incoming on your web post.
Define and How to increase Google page rank ways

What can affect the pagerank?

Content Quality
Incoming links
You want to archive good pagerank than above to parameter always to be in mind.

Explanation of Pagerank with Diagram – Incoming Links

You can see the above diagram with weighted percentage in ball. Pagerank directly depends on incoming link for your web page from the outside world’s web. That means you can archive more incoming links you will get higher PageRank.
If you are getting incoming links from higher PageRanked web to your pages. Then this is good for your web.

Explanation of Pagerank – content quality

Google algorithm is also structured on Quality of your article. Google search engine also check duplicate content for this post.
What are the basic things to get higher pagerank?
Finally you will get idea how to increase pagerank from the above example. Now we have to create incoming links for all post separately. You can create incoming link through the number of way from SEO strategy.
1. Submit in free directory listing
2. Submit your post URL to Google, Bing and Yahoo search engine.
3. Post commenting your link on high pagerank web

What will get after archive good pagerank?

You can archive Good SERP(Search Engine Result Page) rank. SERP rank can be archive using the Best and most popular keyword which is searches by people in google and other top most search engines.
Adsense also count your website or blog pagerank. You have to check your pagerank before submitting in google adsense. You can check your web pagerank over the internet online. To check click here

Final Word:
You can see the value of incoming links, Content quality for pagerank. Now our next article on How to be a good in Content quality and incoming links counts.

Other search:
How to define pagerank in simple terms, what is pagerank, List of factors depends on pagerank, How to increase pagerank of blog and website sharply. What is relation of SERP and Pagerank in SEO(Search Engine Optimization).

I hope that you like effective and short explanation with example. Share this article on social sites from the below sharing button. If you have any question than put in below comment box.

Labels: , ,

Tuesday, 22 July 2014

How to disable touch in laptop for windows 8 or windows 7 – Remove touch screen

New technology (touch access) in laptop, you can access your system using touch installed with windows 7 and windows 8. Using touch you can helps only for personal usage, but when you are in group or on way of travelling, touch functionality will tolerate you by unexpected touch your figures and some object. At that time you might be lose useful data through unexpected removed.

Useful: Best windows 8 and 8.1 theme free download.
touch disabled in windows 8 or windows 8.1

Here you have to follow the below steps to disable or remove touch screen in laptop on windows 8 or windows 7.

1. Open the Device manager from start menu search box given below.

Disable touch in windows 8 and windows 7


2. Once you opened, Device manager in your screen, Select human Interface Devices and click to expand it.

3. Under the human interface devices, You will find number of HID device options. From this list select HID – compatible touch screen option.

4. Right click on HID – Compatible touch option than select disable option. To quite touch on your windows 8 screen.
Disable touch in windows 8 and windows 7 step 2
If you want to start touch in windows 8 system, same procedure should be doing in reverse steps.
Don’t miss: Adobe Photoshop for windows full version.

Related search:
How to stop touch screen in windows 8 laptop and machine
Disable or remove touch on windows 8 OS.

Are you getting problem on stop or disable touch windows screen than comment in below comment box. We glad to assist you.

Labels: , , , , ,

Monday, 21 July 2014

How to Access internet without router password in windows 7 and windows 8

Many of friends and my readers have a query on access internet over wi-fi without password in windows 7 or windows 8. That’s not easy process to start internet on your laptop or mobile without wi-fi (router) password. Here is the alternative way to start internet without wireless router password. To access internet without router password you must have to follow the below simple steps.

Note: default password in your router same for all. Here you want to change if you want it password protected.

Steps on How to access internet without router password in windows 7 or windows 8

You are using one or more system from single LAN cable. That you must have to use router (wired or wireless router). If you are using wireless router or modem, you have password of your wi-fi router connection. Before to start internet, you must have wi-fi password.

Step 1
From the start menu search RUN window from search box.
press windows + R key from your keyboard.
Than type run in text box, press Ok button.
RUN windows in windows 7

Step 2
After completing step 1 you can see black screen windows in your windows 7 or windows 8 system.
In this window type ipconfig, and press enter.
IP address of your network connection
You can see sample of my iP address information.

Step 3
From this screen, you will find result of your four different iP address.
From last one, you can see default Gateway address; Note that address and type in windows 7 or windows 8 browser.
Now you will see below screen,
Authentication screen on your browser

Step 4
From here you have to enter username and password in browser popup, Showing in step 3, Default username and password is admin and admin.
Username: Admin
Password: admin

If you can access, that type your router or modem name in Google and find default username and password for your router.


Don’t miss: How to know wi-fi password of unknown wi-fi network in mobile and laptop.

I hope you enjoyed on “How to update or access router without username and password”. Any problem than comment in below. We will glad to help you.

Labels: , , , , ,

Thursday, 17 July 2014

How to enable/start front audio jack in windows 7 and windows 8

Start or enable front audio jack in your computer cpu with  windows 7 or windows 8 OS. By default in your windows system you can listen audio from front audio jack in your cpu cabin. To connect your microphone or speaker from front audio jack you have to follow some installation steps and some audio settings also. Here you will find solved solution on how to enable or use front audio (microphone) jack from your computer with windows 7 or windows 8 OS.

Steps to enable or use front audio jack in your windows 7 or windows 8 computer

At first you must have to use realtek audio software. This is audio driver to turn front or back side audio start in vise versa. You can download realtek audio driver from its official site for your 32 or 64 bit windows OS.
Link to download realtek audio driver: clickhere

After download completed, install it in your windows 7 or windows 8 system. now follow the below simple steps in serially.

Step 1
Go to control panel from start menu, Under the control panel you can see option for realtek audio HD manager option. (Given in below screen).
enable from audio jack in windows 7 and windows 8 computer - step 1
enable from audio jack in windows 7 and windows 8 computer - step 2

Step 2
Now on your right hand top corner of the setup, you can see yellow folder option. Than disable rear audio jack and enable front audio jack. Than press OK button.
enable from audio jack in windows 7 and windows 8 computer - step 3
enable from audio jack in windows 7 and windows 8 computer - step 4

Step 3
Now uncheck check box for enable front audio jack in your windows 7 and windows 8, from audio port.

Step 4
Finally click ok button, you can also change sound effect that you want as in advance settings.
Now you are done.
enable from audio jack in windows 7 and windows 8 computer - step 5
source: [http://windows7themes.net/]

Now you can enjoying with front audio jack that don’t working to listen music or sound using speaker or microphone audio pin. Have you any problem and suggestion than comment in below, we are glad to assist you.

Labels: , , , ,

Tuesday, 15 July 2014

Best directory free submission site without reciprocal link submit your website or blog URL

Directory submission is the best practice to increase backlinks, traffic and pagerank as organic search from top best search engines. From this post you can increase your site becklinks in easy way.

Don’t miss: Best seo(Search engine optimization) technique you might be miss one of them.

Useful: Make free website from 1 year free hosting and domain (offer).

Here this is list of best directory submission site, in below directory submission sites you have to simply submit title, description, keyword, Meta name, and category. I listed below directory based on good pagerank. So after creating link with good page
rank number you will automatically index or good pagerank.
Directory list for free submission and no reciprocal link

Top best free directory submission sites: submit URL Without reciprocal link

Make you submission easy: very useful way to submit your url to all below directory at once in your browser.

http://www.traveltourismdirectory.net/submit.php
http://www.highrankdirectory.com/submit.php
http://www.britainbusinessdirectory.com/submit.php
http://www.gmawebdirectory.com/submit.php
http://www.siteswebdirectory.com/submit.php?c=2423&LINK_TYPE=2
http://www.usalistingdirectory.com/submit.php
http://www.ukinternetdirectory.net/submit.php
http://armenianlinks.com/cgi-bin/links/addlink.cgi
http://www.officialsearch.com/thanko.html
http://www.somuch.com/submit-links/submit-link-result.asp?LinkID=1692044&UserID=707696
http://www.vision-iq.com/submit.php
http://www.w3catalog.com/submit.php
http://www.1websdirectory.com/add_data.aspx
http://www.askdirectory.com/cgi-bin/addurl2.cgi
http://www.freedirectorysubmit.com/submit.php?LINK_TYPE=2
http://www.towebmaster.net/submit.php?c=121&LINK_TYPE=1
http://glitterdirectory.com/suggest-listing.php?id=876
http://www.prdirectorylist.com/submit.php
http://www.abovealldirectory.com/thanks.php
http://www.bdrecs.com/
http://www.generalinternetdirectory.ws/
http://www.fastdirectorylist.com/
http://thevisitdirectory.com/
http://dizila.com/
http://www.jewana.com/
http://www.freeprwebdirectory.com/submit.php
http://www.sitepromotiondirectory.com/submit.php
http://www.traveltourismdirectory.net/submit.php
http://www.submissionwebdirectory.com/submit.php
http://www.marketinginternetdirectory.com/submit.php
http://www.a1webdirectory.org/submit?c=152&LINK_TYPE=1
http://www.blogrollcenter.com/add_site.htm
http://www.londinium.com/join
http://www.enterprisesearch.com.au/free-search-engine-listing/thankyou.php?
http://www.gallerypage.com/submit.php?c=72&LINK_TYPE=2
http://financebuster.com/submit.php
http://www.siteswebdirectory.com/submit.php?c=2386&LINK_TYPE=2
http://www.alistsites.com/submit.php
http://www.shipre.net/submit.php
http://www.weblinkqueue.com/
http://dailydirectory.comuf.com/
www.vef-sas.com www.loanfinance4u.co.uk
www.active-lists.com
www.globaldirectory4u.com
www.itsadirectory.com

Related search,
Top directory in 2014 to submit website and blog
Best free directory submission sites list without reciprocal link
High page rank directory free site


Top best directory submission site for website and blog to increase becklink and page rank from listed in above.

Labels: , , , , ,

Monday, 14 July 2014

How to make windows 7 bootable DVD from iSO file – Burn windows 7 bootable DVD from iSO

More over friends are always confused on how to make windows 7 bootable DVD with burning process. Without bootable DVD you can’t install windows 7 in your computer, Laptop. To install windows 7, you need bootable pen drive or Bootable DVD. You make bootable windows 7 DVD from iOS file, Windows 7 DVD or Windows 7 copied DVD files. This post includes both method to make bootable windows 7 DVD.

  1. Make bootable windows 7 DVD from copied windows 7 folder
  2. Make Bootable windows 7 DVD from iOS file (Single file with extension .iOS).


Both methods are both easy, here I explained using powerISO open source software to make bootable DVD in easy way.

Methods to make bootable windows 7 DVD

Download PoweriSO, we use Power iOS in both methods. To download click here(36 bit/ 68 bit)

Method 1: Windows 7 bootable DVD from iOS file

Step 1: Open installed PoweriOS,
Step 2: Click on Add icon from top menu bar, Now you can see brows option with small window. Select all files and folders that locate in your windows 7 DVD or in your computer hard disk.
Click ADD.

Select All files and folders copied on your harddrive
Step 3: After step 2, You can see all files and folders are added in power iSO.
Add all folder of windows 7 DVD
Step 4: Now go menu, Action > Boot > Add boot information.
Add boot file in setup
Step 5: You can see small window at first click on Brows folder button(1) given in image.
Move in boot folder, Select etsfboot.com file
Then click Ok.
Add boot file in setup 1
Add boot file in setup 2
DVD Burn in progress
Step 6: Burning process started with click on burn button from the below picture.
Burn start process to make windows 7 DVD Using PowerIOS
Step 7: Wait for 5 to 8 minutes. Bootable DVD automatically eject from your DVD writer.
Burning Of DVD complete
Now you ARE DONE!!

Method 2: Windows 7 bootable DVD from copied windows 7 DVD files

This method is use as alternatives of method 1. You have only use this method if you have iOS file of windows 7.
Step 1: Click on ADD from top bar of poweriSO. Select iOS file though brows option. Click on Add button.
Make windows 7 bootable DVD using powerISO
Step 2: Click on Burn from top bar of PoweriSO given in below image,

Than start burning process with tap on burn button.
Start burn DVD from windows 7 iSO file
Start burn process
Start burn process
DVD Burn in progress
Wait for windows 7 DVD burning process. After completing DVD auto eject from DVD writer.

DVD burned successfully.

You want any suggestion and guide than comment in below. You can check other useful tips and tricks on computer, internet and how to guide. This post helps you than don’t miss to share with your friends.

Labels: , , , , , , , ,

Saturday, 12 July 2014

[Solved] Can’t showing option to show hidden file in computer windows 7 and windows 8.1

Inside folder and search option you can see option to enable to show files and folder in your computer, Windows 7 and windows 8.1 OS. More over system crash time or system format time it will create problems like hidden files are disabled for all time. So you can get this option to show hidden files and folders from your whole windows system.

If you are finding option to show hidden files and folders option in windows 7 and windows 8.1. open windows explorer > Organize(at top left screen) > Folder and search options > View > Show hidden files, Folders and drives option

Useful: Install windows 8 theme in windows 7 OS

But some of the time Show hidden files, Folders and drives option cant there under views tab.

Here Basic step to show hidden files and folders in windows 7 and windows 8

Step 1

1. Go start button > Type run in search box.
2. In run windows type regedit inside the text box and click oK.
3. After that you will find one windows screen in your desktop.
4. From there Go on below path

HKEY_LOCAL_MACHINE\SOFTWARE\Microsoft\Windows\CurrentVersion\
Explorer\Advanced\Folder\Hidden\SHOWALL

After moving on above path, from the right pane of the windows you will see below screen.
From there delete Checked value file by right clicking on it file.

5. After create new DWORD. By right clicking from this pane.
Right click > New > DWORD Value

6. In new file enter value given in below,
Name: Checked Value
Type: REG_DWORD
Data: 1

show hidden files and folders

Step 2: Second part to show hidden files and folders


1. Download this registry file in your system by right click and save file as. In your desktop (Easy to access).
2. Double click on this registry file.
3. After click on you will see alert message to add this file in your system. Press Yes button.
4. Now you are able to see option to show hidden files, Folders and drives option under the folder option.
Enable hidden files and folders option from settings tab

Don’t miss: Latest Nero 12 full download for your windows 7 and windows 8

You are still facing problem on show hidden files and folders, Comment in below comment box.
This article helps to solve your problem than share with your friends through below social button.
To know more tips and tricks on computer, Internet than subscribe with email in below.

Labels: , , , , ,

Friday, 11 July 2014

How to set password in Microsoft excel file at open file in your computer

This time security is requiring losing data and cheating by unknown people. So one of them is set password in your Microsoft excel file. So in this tutorial I try to set maximum option to make your excel file secure and password protected. In previously I share on how to recover data in Microsoft office document file from unexpected close.

Useful: Set minimum auto save time in Microsoft office document.
Save your word file in PDF format directly without any software.

Here you can saved your excel data in two different ways gives In below, Total secure and partial security

Access password: Set password to open file in your computer
Read only security: Make your file read only

Password set in excel file to protect data
Set password to open your Microsoft excel file
Below step you have to follow for open file in secure way. To open file you must have to enter password.

Step 1
Click on review from the top tab,
Go review > Protect Workbook > Protect structure and windows
Enter password that you have to enter open excel file.
Set password to open Excel file from windows device
Re-enter same password for verification match

Re enter password for open excel file
Step 2
Click on office button (from top left corner of the screen),
Go, office button > Prepare > Encrypt document
Enter password same that entered in step 1
Make your excel file more secure with encrypt document option
- Enter password second time for verification.
Set password for encrypt excel doc

Set password for read only access

Steps to Make your file read only: To edit or change password require to do so follow the below steps.

Step 1
Go review > Protect Sheet
After that you can see dial box with multiple options, From there you have to enter password which you want to set,
Set password in Excel to protect data
Reenter password dialog box to verify password.
Re enter password to set password in Excel

Above security protect your data, no one can add and delete data from your Microsoft office excel file.
Excel protected with editing in file
Related search,
Make excel sheet password protected,
How to hide data in excel from unknown users

Don't miss: Convert Gmail email in PDF format directly.

If you like this how to guide, Don’t miss to share with your friends. You have any problem related to this article than comment in below comment box.

Labels: , , , ,

Thursday, 10 July 2014

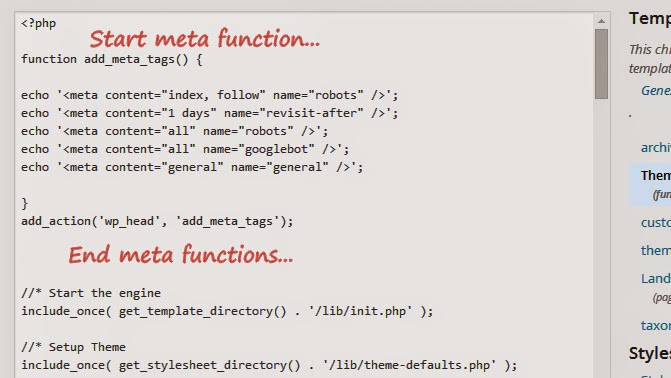
How to add Meta tags inside head tag of wordpress website php code file

More over webmaster and SEO master always find the way to add meta tag inside head section of wordpress website. You can also check meta tags important on your website traffic directly from top best search engines. Know more about meta tag from official site click here. From this post you can learn about why we have to add meta tags inside wordpress website and how to add meta tags in inside head section of wordpress body.

Don’t miss: Top best free directory submission site for website.

Using this methods you can also add google analytics code inside head tag of wordpress website.

Note: Using this method for add meta tags in side head section you don’t need any meta tags wordpress plugins.
Add meta tags inside head tag

Why we have to add meta tags in head section of wordpress php file

1. Meta tag guide to search engine for indexing with time to time.
2. Meta tag defines description, title and author of website or blog.
3. It also helps to blog some url from search engine for all time.
4. Meta tags have hundreds of name and value parameters.

Steps to add wordpress Meta tag inside head tag of wordpress website through code – without plugin

Step 1
From the dashboard go
Appearance > Editor
From that you have to open functions.php file.


Open function file of your WordPress website

Open Functions php file from side files


Step 2
Go functions.php file from righ side bar of wordpress dashboard. (Given in below)
image
Past below code in function in side php tag. Given in below.

function add_meta_tags() {
echo '<meta content="index, follow" name="robots" />';
echo '<meta content="1 days" name="revisit-after" />';
echo '<meta content="all" name="robots" />';
echo '<meta content="all" name="googlebot" />';
echo '<meta content="general" name="general" />';
}

add_action('wp_head', 'add_meta_tags');
Meta code inside function php file

Step 3
After adding file click on save button file
Now you are done,

Related search:
• How to add bing meta tag inside head file in wordpress.
• How to add more than one meta tags inside head in php code file.

Useful: Top best keyword density checker tools for your blog or website.

I hope you have solved your solution. If you are not able to add meta tads inside head section on wordpress code file than comment in below. If you like this article on your search how to add meta tag inside php code file don’t miss to share.

Labels: , , , , , ,

Wednesday, 9 July 2014

How to work on freelancer.com: steps to bid open project at your home

Freelancer paid job from your home make to earn money from learning at your home. You have experience on particular field like software development, website development, SEO work, Marketing, Data entry and other 50+ job type available on freelancer. You can earn lot of money from thousand of new project shared by client over worldwide. From the freelancer you can earn money in international currency over worldwide. To earn money from freelancer you don’t have to pay money to me or freelancer official site. You can takeover much money from 30 day trial period and free bid points with new account opening. Don’t west time in your school and collage time duration? More over friends can’t find and search on this topic that I want to share with kind helps.

Useful: you don’t know these best ways to make money online from easy way, now.
Don’t miss: Get free talk time in your android mobile. Earn extra money from instagram.

Importance of bid points in freelancer

More bid point gives chance to get more work in your interest, To take project or task by client which is uploaded as project. To get one project you need 1 bid point.
Ex: you have 30 bid points that you can participate in 30 different projects in your cart maximum.

Steps to bid and work on freelancer, Make money from freelancing job


Step 1
Go freelancer.com from here, register yourself with correct information. Your are register with freelancer that login with email and password.

Step 2
After registration verify your accounts from your registered email address available in mail inbox. Through verification you can get extra bid points in your freelancer accent.

To get more bid points and level kindly submit all required details.

Step 3
Move project category type that you want to do as of your time limitation and categories.
Go Brows project > Select project that you want to find (Brows category if best to find)
See all the steps given in below.


Work on freelancer com brows project

Wide verity of project and job on freelancer


Step 4:
Select project that you want to do.

Successfully add project as bid in freelancer account

place bid on freelancer project from your account
do Bid on project on selected category
Step 5:
Bid project if you are eligible to do this project in time. Otherwise bad impression makes you work hard to find big project on freelancer.com
Useful: Make money with blogging for all time.

Related,
Make money from freelancer,
Step by step guide to bid on project and work in freelancer.
How to work at home in freelancer?

Thanks for reading, I hope you must enjoy this post as of you find. So comment in below comment box if you have any suggestion and problem. We will be glad to assist you.

Labels: , , , , ,

Monday, 7 July 2014

Top Best Keyword density checker tools to improve SEO score and traffic in your website or blog

Best Keyword density checker tools, to find Keyword density is very important to improve SEO score in correct way. We must have to use top keyword finder tools listed in 2014. Keyword density checker tools calculate keyword from your whole post that’s include post title, post content, post URL, post alternative tag. After counting all the word, at the end of reply on your keyword you can find percentage of keyword you are using. Using these Best Keyword density checker tools you can find keyword in percentage of keyword you have used.

Useful: Best social networking site that’s never miss in blogging.

As rules of SEO master, best customized post with keyword contained 2 to 3% of the keyword has been used in whole post. You are not using keyword in post in this ratio then you’re writing and post is poor in front of search engine.

Best Keyword density checker tools in 2014


Millions of people, Blogger and webmaster using these keyword density checker tools. i listed top best four keyword density checker tools in briefly.

1. SEO Book, Best keyword density checker tools

SEO book keyword checker tools online, Using this tools you don’t need any installation. You can manage your article and make SEO friendly easily. SEO book gives very fast result as compare to other SEO checker tools over internet.
Best keyword density checker tools
To know your own keyword density from whole blog or website. You have to submit URL of your blog only in text area field.

2. SEOCentro Keyword Density Tools

SEO Centro keyword density tools is most popular keyword analyzer tools to analyse keyword in your website or blog. Using this tool you can get decision on which keyword you have to use to balance between most popular search term keyword in top best search engine.
Most popular Keyword checker tools

3. Keyword Density checker

Small keyword density checker tools, This tools gives more option as compare to above two keyword density checker tools. From this post you have to add some text in text area and keyword which you want to find. Before that you have to submit URL of your blog or website.
Keyword Checker tools free

4. Keyword Density analyzer

Keyword density.com, from this tools you can get total keyword density from two different URL. As a result you can analyze keyword you have entered in text field in below of the two URL box.
Keyword Density analyzer
Useful: Best SEO tools and plugins for wordpress and BlogSpot blogging.

After Daily use of top best above keyword analyzer tools you must use google analytics. You know other best tools, give comment in below comment box.

Labels: , , , , ,

Friday, 4 July 2014

Best apps and ways to hide Apps on android from unknown people

Android Apps like Gaming, Online buying, banking apps must be placing in secure from unknown people. In latest android version Application hiding option are available built in, for that you don’t need to install and other hiding apps. But you have lower version of android OS version, you must have application hiding apps. That’s given in below.

To hide application, here I explain different two (methods) ways for android mobile.

Useful: Play any android game on Mac OS X, Step by step guide.
              Access your PC on android mobile remotely.

Best ways to hide/lock apps in android mobile

Method 1: Without any application hide installed application

Without install any message hiding application

1. Open the app Gallery in your mobile.

2. Tap the right click menu in your Mobile. And select “Hide applications” options. After selecting this option you can multiple check option on each application.

Hide Android app from android mobile- ways to hide apps


3. Now select apps you want to hide from App gallery. After selecting app from app gallery click ok button.

If you want to unhide selected app which hiding, you should have follow the reverse process.

Method 2: Best Apps to hide Application

Using locking hiding app, Second ways to hide message. But in this several drawbacks are ahead. But you can use it easily.
Drawbacks of to use application hiding apps: To hide apps from app gallery
Lock app is the best application to hide application in application browser in secure way.
Step 1
You can download hide/lock apps from google play store: here
After downloading apps, install it in your android mobile.

Step 2
Open Lock app in your android mobile, at the first time you have to set password for your apps. Which helps to make your mobile secure.
Lock or hide apps from your android mobile
Step 3
Now your next step should be select application that you want to hide/lock with your password.
Now it can’t open without password that set in app lock.
Select application - You want to hide from app browser

Useful: How to resize or scan passport size photo without scanner?
              Step by step guide on Play any android game on PC or laptop.

Now your job is done,
It helpful to you, so don’t miss to share it with your friends.

Labels: , , , , ,